Showing posts with label Halloween. Show all posts

October 31, 2013

Halloween 2013

Happy Halloween, my friends :)
May your home glow with the spirit of fun as you hold your candy bowl
(and sneek one or two or five of them!)

May you walk through rustling leaves and up & down steps (a zillion times :)
with your darling trick or treaters!
May deliciously frightful Jack - O - lanterns greet you and smile at you
on this Halloween Night!

October 17, 2013

Candy Towel Pillow

Hello Everyone!
Here is a super quick Halloween project that is suited to the season
~ just sweetly ~ 
This cute witch pillow is made from (2) hand towels.
When you are shopping the after-holiday sales,
don't discount the decorative towels for projects!
 Here's the how-to :
• Fold the bath towel into thirds 
•Roll it tightly into a log shape & place at the opposite
end of the applique (witch)
•Roll tightly the (2) towels together; just like candy in a wrapper!
•Gather ribbons, strings etc and tie the ends tightly
(Make sure the applique is centered)
You are all done! Easy, easy!

October 9, 2013

Mummy Bookmarks

Hello Again, Everyone!
Here is another simple (more simple, really!) 
Halloween kids' or classroom craft idea.
I think I saw these online awhile back and I'm sorry... I'm unsure of the link! 
boo!
 I brought this craft to make at my daughter's classroom 
Halloween party actually about a couple years ago.
They are super, super easy!
(Maybe too fast for centers! It works, but have a Halloween story to read just in case)
Your cute toddlers at home could probably even handle this craft!
Supply List
• jumbo craft sticks • 21"x 1"strips of muslin • googly eyes • glue/glue sticks

      
  1. Cut a small snip in fabric with scissors and then rip to 'cut' the fabric into strips so they have rough edges.
  2. Glue strip to the top back of the craft stick.
  3. On the other side of the craft stick, mark with a crayon/marker/pen a line about 1 inch down from the top.
  4. Glue the googly eyes on the line; they will hang over the stick slightly. You can glue slightly on an angle if you prefer. Sorry about not having the size of the googly eyes! Below photo is a measurement.
         
5.  Wrap strip a couple times above the eyes and then start to wrap underneath
      the eyes.

 6. Continue wrapping; overlapping the strip to the bottom of the stick.

             
 7. Glue bottom of strip on the back side of the craft stick. 
 8. Trim any loose threads and you're done!
Mark your spooky place in your favorite book! 
CraftalaMode, Craftberry Bush, Tatertots and Jello

October 3, 2013

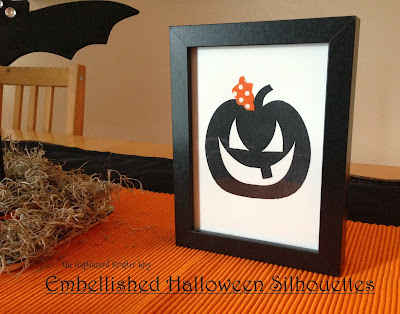
Embellished Halloween Silhouettes

Happy Halloween!

Its October! 
Time for our Halloween decorations to adorn our homes!

I admit I pretty much 'played' all day yesterday...
(decorating that is, and not much housework - haha!

Here's a few photos of what I was up to :)


Kami over at No Biggie kindly offers 
awesome free printable Halloween silhouettes

So, I followed how she printed, traced and framed them, however, I added a little embellishment on each one to help add color and creativity! 

(I just had plain black Ikea frames, so they needed a little somethin' somethin'...)


 Orange and White Polka-Dot Ribbon Leaf
Chunky Orange Yarn Bow and Rhinestone Eyes
Dried Moss w/Rhinestone Eye
Purple & Green Polka Dot Ribbon w/Green Rhinestone 'Wart' (love!)

Thanks again to Kami for the inspiration and allowing me to add
'kool' decor to my Halloween stash this year.

And thanks to you for stopping by today!

August 28, 2013

Halloween Kids Kraft


It's that time (soon) again!  I love Halloween!
And I love volunteering to help with class holiday parties at my girls' school.
Last year for my 1st grader's Halloween party we made these:

Cute tissue paper art! 


I was thinking of tissue paper art 'old school style' where a small square-ish piece of tissue paper is wrapped around the eraser end of a pencil and then glued down, but my friend told me about how you can just 'crinkle' the tissue and then adhere. And it works great!

Bring one already completed to show the kids
what they will be creating! 


1. Cut out several (one for each child) black foam board pieces with an x acto knife and use a hole punch to make a hole for the yarn-loop tie. 

2. Draw a pumpkin shape with a stem on card stock/paper, but only trace the pumpkin shape (not stem) onto the black foam board with a white crayon. 

3. Cut lots and lots of orange tissue paper as well as a good amount of   black tissue paper in small pieces .

4. Gather small flat or semi-flat pieces of bark to glue on as the stem.

5. Remember to have the children write their names on the back with white crayon before beginning the glueing of crinkled paper and bark.

And here is my cute daughter's project! Yeah... looks like she started to write her name on front... haha :)


October 29, 2012

Halloween Wall Decor - Part 2 & 3


I finally finished up my Halloween Wall Decor; only to be putting it away soon because Halloween is almost here, right? haha :)

           
Fred and Daphne from Scooby Doo ~ Cute Witch and Sweet Barbie

Actually, I'm pretty much done with Halloween. Are you? We've attended a Halloween party at church, were invited to a trunk-or-treat with my Sis-in-law's family and I've had my Halloween decorations up I think pretty much since the beginning of the month! I'm ready to move on to something else :) Although, my Thanksgiving posts may be scarce. I don't have a lot to share for that holiday. And I can't seem to think of or find much to create as well.

Anyway... the next applique I created was the pumpkin. Please refer to the Candy Corn Applique for full tutorial.


Again, I created a paper template but cut freehand the black felt face pieces. The great thing about felt is that you can adjust it / trim it to make it look 'just so' even after the initial shape is made. I did that here and also on the candy corn applique. To make the raffia curly Q's, please follow my tutorial from my Rustic Pumpkins post. Here's a photo for a clue.


After playing around with the placement of the face pieces I top stitched them into place with my machine. You can see that his eye on the left got all wonky! Unfortunately or fortunately that's how I roll - haha! At this point his eye either looks kind of pirate-y or perhaps 'he' is a 'she' and her false eyelash is a little droopy. Or the pumpkin is giving a little wink ;)


Who else than the 'Queen of Craft' (aka Martha Stewart) to give me a perfect bat template! Each one by themselves was not the right scale, so I ended up using 2 of the small sized bats.


Tape template to black felt and cut out bat shape. Glue down bats and machine top stitch.


For the eyes, they are small self-adhesive cell phone acrylic gems. Add a touch of craft glue with a straight pin to help adhere. 


I added a yellow felt full moon as the whole applique seemed to plain with just the 2 bats.


I used craft glue to adhere all 3 applique 'pillows' to an orange satin ribbon. 


Sew a little loop of embroidery thread to the back and you are ready to hang :)


Happy Halloween !!